

I always wanted to crochet my own beanie, but for some reasons I never did it. I never found the right yarn or the right stitch to make one. I first made a scarf. I loved the scarf so much that I finally could start thinking about a beanie that fits this scarf. So I tried out a design with the same stitch and this hat is the result of it!
Hier kan je de nederlandstalige versie lezen!
If you are not familiar with crocheting, you can always buy the beanie and the scarf in my shop! As you can see I also have a suited laptop sleeve as well!
Now it is time to start with the explanation of the pattern!
Material
- hook number 4,5
- yarn : cookie yarn from hobbii.nl, or a yarn that has the same weight of course!
- in the round knitting needles nr 3
If you want a pdf-version of this pattern (without ads of course!), you can purchase the pattern here!
Gauge
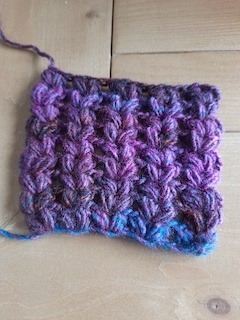
Start with a chain of 18 stitches + two stitches extra. Make a first puff -stitch with tree loops in in the third chain. Make another puff-stitch in same stitch. Skip one stitch and make another V-puff -stitch (two puff stitches in the same stitch). in the next stitch. If you are not familiar with the puff-stitch read this article. There you get a clear explanation of it!. After the 5th V-puff stitch turn and start another new row. Make V-puff-stitches in de middle of the V-puff stitches of the previous row.
I needed 9 rows and 5 v-puff stitches in a row to have a square of 10 cm x 10 cm.
If you are not experienced with v-puff stitches you can learn this awesome stitch here. It is a stitch a really like to make snuggly warm accessories as you will notice in this post!
Start with a magic ring, and make a circle
We crochet the beanie from top to down. The border is knitted, to make it more fitting.
At first start with a magic ring of 8 single crochets. After this first round we make our first tour with v-puff stitches, you must have 4 in total. I made a table of how many stitches you have to increase every round.
Table with number of increases in each tour
| Number of round | Number of increases | Number of stitches | Diameter in cm |
| 1 | 0 | 4 | 8 |
| 2 | 5 | 9 | 18 |
| 3 | 5 | 14 | 28 |
| 4 | 4 | 18 | 36 |
| 5 | 4 | 22 | 44 |
| 6 | 3 | 25 | 50 |
I hope the table is clear, in the first column you see the round number, the second how many increases you have to make during this round. In the third round you see how many v-stitches you must have after finishing the round. And the last column indicates the diameter of the circle, it is only an indication of course, it is depending the way you hook of course. It is best not to deviate too much from it to maintain a good result!
When you have to increase a number of stitches, divide this stitches over the previous row equally, this gives you a more beautiful result! You best increase a stitch between to puff-stitches.


After finishing the sixth row, now it is time to do some tours without increases. Crochet 15 rows and the height of the beanie will be perfect! Of course you may crochet more are less rows! But take into account we still have to make a border!

A little bit of knitting too
Yes, I knitted a bit too. I wanted the beanie to close better, and I thought why not a bit of knitting, I always like a border knitted, I have chosen for a 2/2 border stitch. That is 2/2 tricot. I took for each V-stitch 3 stitches on my rounded needles. Just make sure that for every V-stitch you have 3 to have a beautiful knitted border! The border has to be wide enough.

The first round I make only right stitches and after every 3 stitches I increase with one stitch, so you become 100 stitches. Start in the second row the 2/2 border stitch. I knitted 8 rounds, to have a beautiful small border. But it is always to your wish how many rounds you make!


So I hope this explanation was clear. But if you encounter some difficulties with it don’t hesitate to contact me! I’m always ready to help!
xox Greet
beautiful