

Crocheted flowers, lovely to make. I have crocheted flowers before, but this flower is even easier to crochet. Here you can see how with just a magic ring, chain stitches, single crochet and slip stitch you can crochet this flower in just 10 minutes!
Lees hier verder in het Nederlands.
A lot can be done with these simple crochet flowers. With a safety pin you can make a beautiful brooch. For a summer scarf, sew the flowers together nicely. Or crochet many more for a beautiful flower blanket. At least I’ll crochet a few more for a nice summer scarf .
.
Pattern
The pattern itself is very simple. It is especially useful that the petals are immediately hooked to the entire flower. The only point with any attention is to crochet along the bottom of the chain near the petal! But a photo of how you do it step by step makes it very clear.
Material
- 1 ball Drops Safran (Of course you can get several flowers from 1 ball, no less than 20!) or Schachenmayr Catania(*) both 5ply sport yarn.
- hook pin nr 3.5 mm (see conversion table for other metrics)
Used stitches
- magical ring ring (you can read how to crochet it here)
- chain stitches (ch)
- single crochet (sc)
- slip stitch
Gauge
Always handy to crochet a test piece, you can visit the next post for this.
So here is the pattern
You can follow the pattern in 2 ways. The first way is through 2 tables, the first table describes the complete flower and the 2nd table describes crocheting a petal in the flower. A second way is through a photo tutorial, the pattern tables contain references to the photo tutorial to make the whole thing clearer.
Pattern table
| round | how to |
|---|---|
| start with a magic ring (read here how to crochet a magic ring) | |
| 1 | crochet 6 sc, join with a slip stitch (photo step 1) |
| 2 | crochet 6 leaves (see how to crochet a leaf) join with a slip stitch (photos step 2 to 11) |
| 3 | work 12 sc over all leaves (each leaf consists of 12 sc) (photo step 12) |
Crochet a leaf (do this 6 times)
| row | how to |
|---|---|
| 0 | single crochet, chain 8 (photo step 2) |
| 1 | work 6 sc, starting in the third ch (photo step 3 -4) |
| 2 | pull your yarn up and work 6 sc at the bottom of the 8 ch (step 5-6-7) |
| 3 | work 6 sc on top of the first 6 sc (step 8) |
| finish the petal by working a slip stitch on the sc worked before the 8 ch (step 9) |
Pattern photo tutorial
 | Step 1 : Crochet a magic ring with 6 sc. Close with a slip stitch. |
 | Step 2 : Work a first sic on the first sc in the ring. Then ch 8 to work the first leaf |
 | Step 3 : On the 3rd ch, crochet the 1st sc of the leaf |
 | Step 4 : Then work 5 more sc up to the ring. |
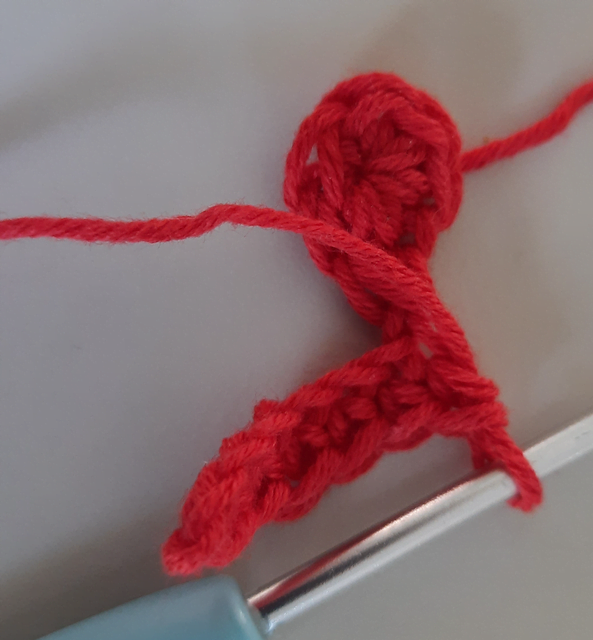 | Step 5 : Lay your thread over the leaf |
 | Step 6 : Crochet a sc at the bottom of the first ch |
 | Step 7 : Work 5 more sc at the bottom of the next 5 ch. |
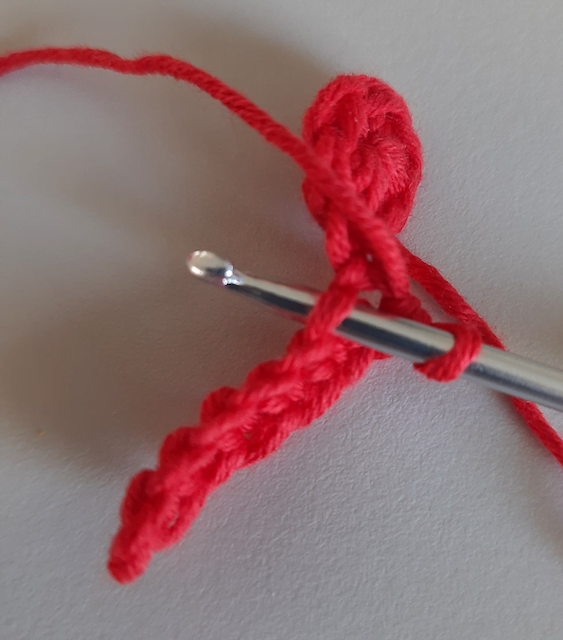
 | Step 8 : Now work around and work 6 sc at the top of the sc. |
 | Step 9 :Work the leaf onto the ring with a slip stitch on the sc on which the leaf was worked. |
 | Step 10 : Crochet a single crochet on the next single crochet from the ring and start with a new leaf (step 2) |
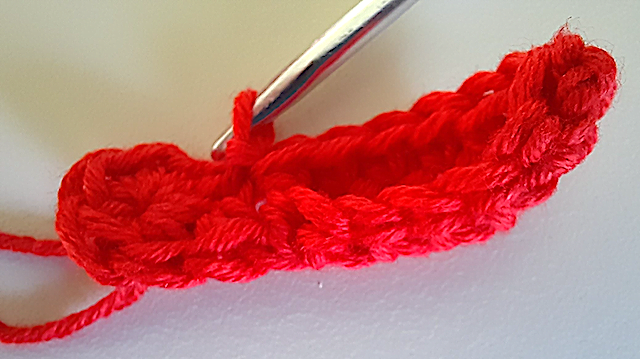
 | Step 11 : Work 5 more leaves (steps 2 to 9) |
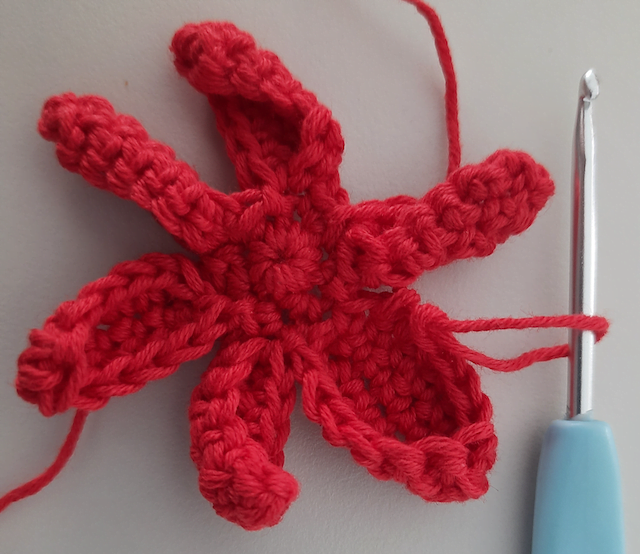 | Step 12 : After crocheting the leaves work single crochets over all the leaves, 72 single crochets in total. |
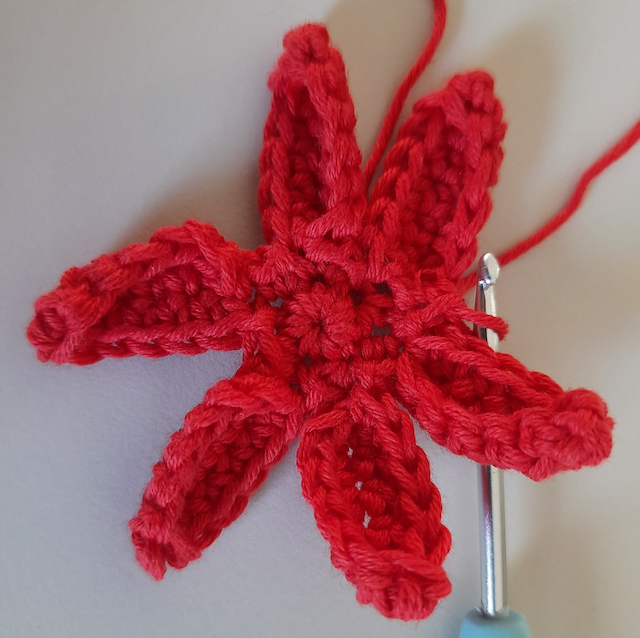
 | Step 13 : This is how you get the flower after crocheting 72 sc. End this round with a slip stitch. Close the flower. |
 | Step 14 : sew in start and end thread |
Photo gallery


There you go, have fun with this easy pattern to crochet flowers quickly!
xox Greet
PS. If you plan to crochet a lot of flowers, then sew in the threads immediately after crocheting 1 flower,… this will save you a very tedious work afterwards!
(*) This blog post contains affiliate links and if you click through them to make a purchase, I will earn a commission. I link these companies and their products because of their quality and service not because of the commission I receive from your purchase. Please read my disclaimer for more info.