

You will find many examples of berets on the internet. Time and of course a lot of ‘enthusiasm’ to design one too. But that is by no means the only reason to crochet a beret, certainly not! This traditional Parisian beret is great for practicing and mastering the rib stitch! This beret looks somewhat traditional, but because of the rib stitch, this one is certainly slightly different!
Je kan het patroon ook hier in het Nederlands lezen.
The Parisian beret for a charming lady living in Paris!

My sister-in-law lives in Paris, the ideal place to wear a beret. So it didn’t surprise me that the next Whatsapp suddenly appeared one day. You guessed it, she asked if I could make her a beret. Of course I did not hesitate for a second. After that I started to have some doubts, and to be honest it took a while to crochet a homemade beret. After 4 tries I was really convinced: “This is it”. I also strive for perfection!
It has to be because Heidi is also involved in the creation of HandmadeRoseBag. She is also my coach and I really get a lot of tips and tricks from her to make my business a success. She is also the person who inspires and encouraged me to realize this. It all started with crocheting bags for my daughter. I had a whole series of them. Heidi recommended that I start an Etsy shop, she saw my work and convinced me to do a little more with it. That’s how the ball started rolling. In addition to the Etsy shop, I also wanted to tell my story next to my products. And here too Heidi is always present to help me on this adventure!
Looking for the right yarn!
Back to the beret project … Very important to me and my sister-in-law. The yarn should feel nice to crochet with. But the beret should also be pleasant to wear. Of course my sister-in-law had some wishes, such as color and very important: the yarn should also not sting. Using some examples, I got details about what was and was not wanted.
Yarn choice
Color shade
I leave the choice of color completely to my ‘customer’. Seems obvious to me! It will be 2 shades of pink.
yarn size
To crochet a winter beret, it is best to use a yarn that is not too fine. For my winter projects, I usually choose a yarn where hook number 4 or 4.5 can be used.
Which yarns?
As mentioned earlier, the yarn should not sting, so my choice fell on acrylic. After some research I know that the chance of not getting stung with this yarn is small. I don’t really have much experience with acrylic myself, only the cookie yarn from hobbi.nl. The choice was further made based on the description of the yarn and customer reviews, certainly very important.
There are 2 possible candidates. I introduced them both to Heidi so she could pick the right shade of pink too.
2 candidates
Budget yarn Acrylic DK
This yarn has a very large color palette, and the yarn is also very affordable, as the name says. With this color palette it is almost impossible not to find the right color.
Amigo
This yarn also has a wide range of colors. You will probably also find the right color shade with this yarn. This yarn is available in the shop where I have already ordered different yarns. Only it is not as affordable as the previous candidate.
Our decision
We find the right pink color in both options, this time it is the price that is the deciding factor. So we choose Budget yarn Acrylic DK. But there is nothing to indicate that Amigo would have been a good choice, I think I will try this yarn for a next project.
I really like the chosen Acrylic yarn to crochet with. The many trials have had no effect on the structure of the yarn. I think that’s a real plus, with many yarns you sometimes get a woolly effect, but certainly not with this yarn!
Rib stitch with half double crochets
This stitch is really a special stitch, when crocheting in the round you would think the piece is knitted instead of crochet and if you use this stitch with rows you will get a nice rib. I actually think it’s very special how a stitch can look different because of the way it is crocheted!
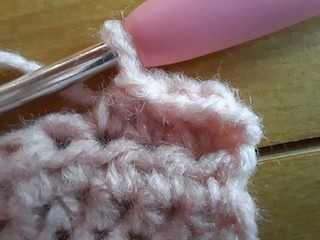
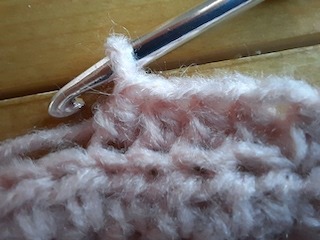
How do you crochet this rib stitch?
The trick consists in not working the half double crochet on top of a previous half double crochet, but in the back loop of this half double crochet. In the photos you can clearly see the difference between the normal half double crochet and the rib stitch. The first photo shows a regular half double crochet, the second the rib stitch with a half double crochet. Because of the rib stitch, the top of the half double crochet from the previous row comes all the way forward.
Pattern
But the most important thing and what you are probably most interested in is the pattern. For those who want this pattern ad-free, the pattern is available in my ravelry store!
Size
The pattern is made for adult, 54 cm circumference, and I’m working on a adjustment of the pattern for a smaller size!
Material
- As mentioned above, Budget yarn Acrylic DK has been chosen, 2 ball (50g or 100m) but an equivalent light yarn is also possible.
- crochet hook 4.5 mm EUR (see conversion table for other systems).
Used stitches
I use the US-terminology.
- magic ring
- single crochets
- slip stitches
- half double crochets
- rib stitch with half double crochets
Gauge
Start with 22 chainstitches, work 2 more chainstitches, which counts as a first half double crochet. Return and work 22 half double crochets for the first row. Then work 12 rows of half double crochets in rib stitch. In this way you get a square of 10 cm by 10 cm.

Pattern
The pattern consists of 2 parts that are crocheted separately. The first part is the round plateau, the second part is the border. Both parts are worked together afterwards. Unique is that both parts are worked with the same ribstitch, but show a different result. This is because part 1 is worked in the round and part two is worked in rows.
Part 1
Part 1 starts with crocheting a large circle, when it is big enough, it comes down to making the circle smaller again. This will also split part 1 into 2 parts. A separate table is shown for each segment, but the numbering of the rounds continues.
Building the circle
| Round | Number of stitches formula : round no x 8 | Number of stitches between the doubling stitch formula :(round no -2) intermediate stitches | Remarks |
|---|---|---|---|
| 0 | magic ring | ||
| 1 | 8 half double crochets | Do not close the ring! | |
| 2 | 16 rib stitches (or half double crochets in the back loop of the stitch) | 0 | Work two rib stitches in each stitch from the previous round. Do not close the loop, place a stitch marker at the start of the tour. |
| 3 | 24 rib stitches (or half double crochets in the back loop of the stitch) | 1 | Start with * 1 rib stitch in the back loop of the first rib stitch of the previous round. Then double the rib stitch in the back loop of the next rib stitch from the previous row *. Repeat from * to * up to 7 times. Don’t close the ring! Stitch the marker on the last rib stitch. |
| 4 | 32 rib stitches (or half double crochets in the back loop of the stitch) | 2 | Do the same as in the previous round, but now work 2 rib stitches before doubling. |
| 5 | 40 rib stiches | 3 | Do the same as in the previous round, but now work 3 rib stitches before doubling. |
| 6 | 48 rib stitches | 4 | Same as previous tour |
| 7 | 56 rib stitches | 5 | Same as previous tour |
| 8 | 64 rib stitches | 6 | Same as previous tour |
| 9 | 72 rib stitches | 7 | Same as previous tour |
| 10 | 80 rib stitches | 8 | Same as previous tour |
| 11 | 88 rib stitches | 9 | Same as previous tour |
| 12 | 96 rib stitches | 10 | Same as previous tour |
| 13 | 104 rib stitches | 11 | Same as previous tour |
| 14 | 112 rib stitches | 12 | Same as previous tour |
| 15 | 120 rib stitches | 13 | Same as previous tour |
| 16 | 128 rib stitches | 14 | Same as previous tour |
| 17 | 136 rib stitches | 15 | Same as previous tour |
| 18 | 144 rib stitches | 16 | Same as previous tour |
| 19 | 152 rib stitches | 17 | Same as previous tour |
| 20 | 160 rib stitches | 18 | Same as previous tour |
| 21 | 168 rib stitches | 19 | Same as previous tour |
| 22 | 176 rib stitches | 20 | Same as previous tour |
| 23 | 184 rib stitches | 21 | Same as previous tour |
From the circle to the edge
| Round no | Number of stitches | Decrease | Remarks |
|---|---|---|---|
| 24 | 176 rib stitches | Skip 1 stitch every 22 stitches. | Start with the second stitch of this row and skip one stitch every 22 stitches, do this for 8 times, place the marker stitch on the first stitch of this row, so you can see where to start the next row. |
| 25 | 168 rib stitches | Skip 1 stitch every 21 stitches. | Start this row after the last decrease from the previous row, the marker is only an indication where you can expect the next row to start, it does not have to be in the exact same place every lap. |
| 26 | 160 rib stitches | Skip 1 stitch every 20 stitches. | Same as previous round |
| 27 | 152 rib stitches | Skip 1 stitch every 19 stitches. | Same as previous round |
| 28 | 144 rib stitches | Skip 1 stitch every 18 stitches. | Same as previous round |
| 29 | 136 rib stitches | Skip 1 stitch every 17 stitches. | Same as previous round |
| 30 | 128 rib stitches | Skip 1 stitch every 16 stitches. | Same as previous round |
| 31 | 120 rib stitches | Skip 1 stitch every 15 stitches. | Same as previous round |
| 32 | 112 rib stitches | Skip 1 stitch every 14 stitches. | Same as previous round |
Pat 2
In this part we crochet the collar of the beret.
| Row no | Remarks |
|---|---|
| 1 | Chain 20 |
| 2 | Start with 2 chain stitches and then crochet 20 half double crochets |
| 3 | Start with 2 chain stitches and then crochet 20 rib stitches |
| Repeat until you have a total of 60 rows. |
bring it all together
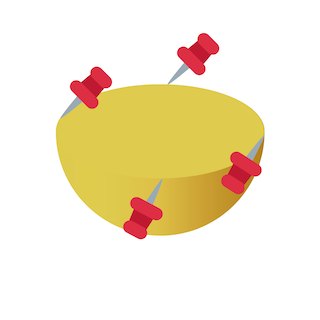
Turn the beret inside out. Pins the collar to the beret. For this it is best to fix the border at 4 points first, as shown in the image below. Then pin the collar even tighter. To do this, stretch a little on the collar. Once the collar is properly attached, hook both parts together with regular single crochets. Finally, crochet the hem of the collar with single crochets.
The end
Now you can also get started with this pattern to crochet this Parisian beret! Feel free to ask me questions if something is not clear, I always answer as soon as possible!
xox Greet


