
With this clear pattern in table form you can easily crochet a beret in 2 days! Lees hier de Nederlandse versie!
Story
Spring is in the air
Spring is coming. For me, early spring means chilly mornings with sometimes a bit of freezing cold and fresh breezes. In the afternoon it can be a bit summery, but the fresh spring breeze can block the heat a bit, in the evening it cools down again and the breeze can still be there. Exactly those fresh breezes and the change in temperatures still make me feel the need to have a hat or beret with me!
Don’t wait to make this beret, it takes only 2 days
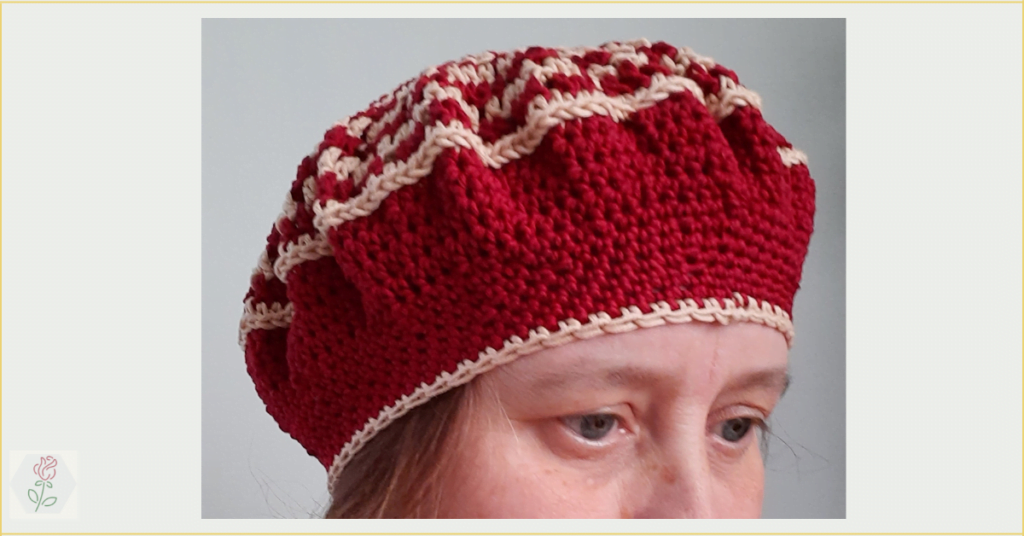
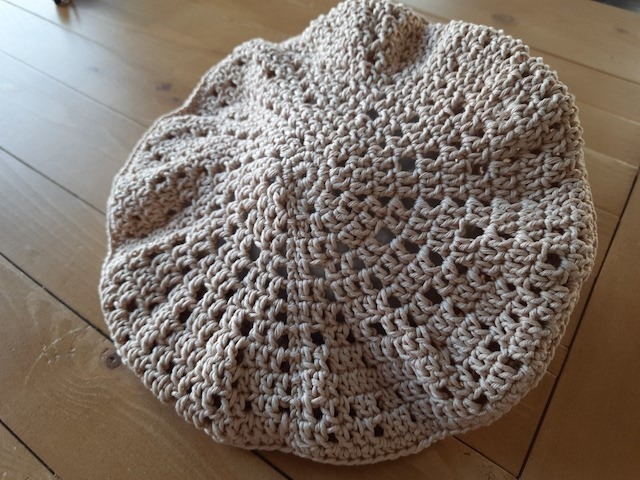
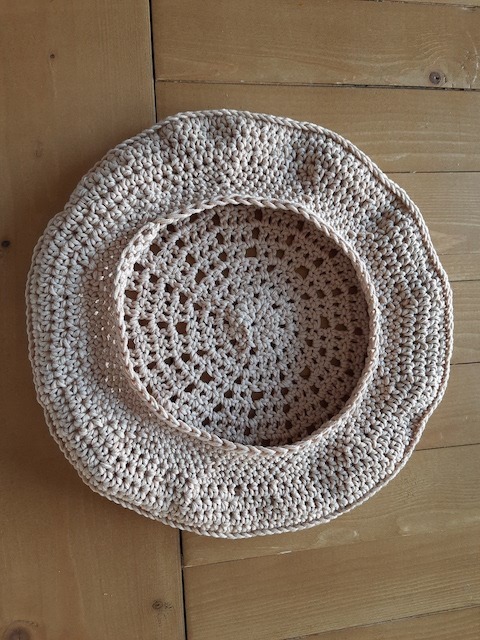
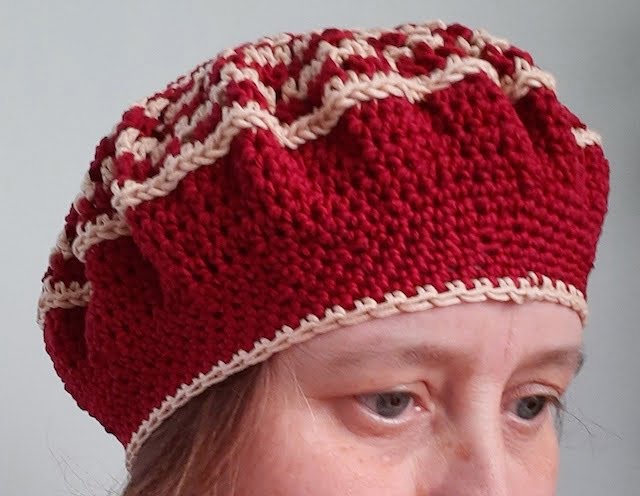
This beret made of mercerized cotton is a great solution for these temperature fluctuations. The crochet pattern is simply explained in table form so that you can easily follow the different rounds. I made 2 versions myself, one plain and one striped. In the pattern the color is indicated, ignore this when crocheting the plain version. I really finished the 2nd version in only 2 days, it is not difficult, it just requires some concentration when changing a tour! With the table-shaped pattern, you can easily crochet a beret in 2 days, ready for spring right away! Don’t wait longer!
Ravelry
Below is a full description of how to crochet this beret. If you prefer a PDF without ads, the pattern is also available on ravelry. An additional advantage, you will always be notified when there is an update of the pattern! Eg, for crocheting a different size.
And if you prefer a more warm beret, you can easily crochet a beret with this pattern!
Pattern
Size
small (if you want a larger size, stop earlier when decreasing in the border, but keep the number of rows of the border the same, it is also indicated in the pattern
Materials
- drops muskat : for the solid-colored beret 2 balls are enough, for the 2-colored 1 ball light beige and 2 ball dark red. This cotton is excellent for crocheting a hat or a beret because it is mercerized. When cotton is commercialized, the cotton acquires different properties, including less deform ability. This means that it is excellent to crochet a hat, the hat will hardly lose its shape, so there is no risk of shrinking or taking off! Drops safran also provides many other colors all suited for this season.
- crochet hook no.4 (if you use another metric system see this conversion table)
Stitches
US terminology is used.
- magic ring or a ring with 6 sc. Here you will find more information on how to crochet a magic ring.
- single crochets (sc)
- slip stitches (sl)
- double stitches (dc)
- half double crochets (hdc)
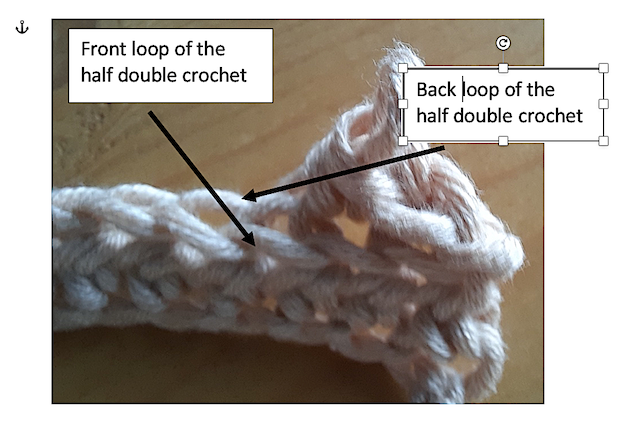
- Half double crochets (hdc) in the back loop. Below is a photo to clarify what is meant by the back loop of a half double crochet. When you crochet a half double crochet in a half double crochet from the previous row, you can easily see the front loop, normally you crochet in this front loop, now you crochet in the back loop of the half double from the previous row. This will bring the front loop of the half double crochet from the previous row to the front.
Gauge
Start with 20 chains of which the last 2 chains count as the first double crochet. Then crochet 17 double crochets from the 3rd chain stitch. Work 10 rows with double crochets. You get a square of 10 cm by 10 cm.
Pattern
In the table below you can see the round number, the color of the round (only needed if you crochet the two-colored beret), the number of stitches in this round, the repeat pattern you will get in the round and how you crochet this repeat pattern in the round.
| Roundnr | Color | Number of stitches | Repeat pattern | Explanation |
| 0 | Magical ring | |||
| 1 | 8 | Crochet 8 sc in this ring | ||
| 2 | 16 | Crochet in each stitch 2 sc. | ||
| 3 | 24 | 2 dc, 1 ch | Start with 2 ch (counts as the first dc), 1 ch and sip 1 sc, repeat until the end of the round, close with a sl | |
| 4 | 32 | 3 dc, 1 ch | Start with 2 ch, 1 dc en 1 dc in the next hole,1 ch, *2 dc in de next 2 dc, 1 dc in the next hole, 1 ch*, repeat until the of the round, close with a sl | |
| 5 | 40 | 4 dc, 1 ch | Start with 2 ch, 2 dc in the next 2 dc en 1 dc in the next hole,1 ch, *3 dc in de next 3 dc, 1 dc in the next hole, 1 ch*, repeat * until the end of the round, close with a sl |
| 6 | 64 | 2 dc, 2 ch | 2 ch, 1 dc, 2 ch, skip 1 dc, 1 dc, 1 dc in the hole, 2 ch, *2 dc, 2 ch, skip 1 dc, 1 dc and 1 dc in the hole, 2 ch *, repeat * until the end of the round, close with a sl | |
| 7 | 80 | 3 dc, 2 ch | Start with 2 ch, 1 dc and 1 dc in the next hole,2 ch, *2 dc in the next 2 dc, 1 dc in de hole, 2 ch*, repeat until the end of the round, close with a sl | |
| 8 | 80 | 4 dc, 1 ch | Start stith 2 ch, 2 dc in the 2 next dc en 1 sdc in the next hole,1 ch, *3 dc in the next 3 dc, 1 dc in the next hole, 1ch*, repeat * until the end of the round, close with a sl | |
| 9 | 128 | 2 dc, 2 ch | Idem 6 |
| 10 | 160 | 3 dc, 2 ch | Idem 7 | |
| 11 | 160 | 4 dc, 1 ch | Idem 8 | |
| 12 | 162 | 2 dc, 1 ch | 2 ch, 1 dc, 1 ch, skip 1 dc, 1 dc, 1 dc in the hole, 1 ch, *2 dc, 1 ch, skip 1 dc, 1 dc adn 1 dc in the, 1 l *, repeat * until the end of the round, close with a sl | |
| 13 | 192 | 3 dc, 1 1 ch | Start with 2 ch, 2dc in the next 2 stichtes(dc or ch), 1 ch, skip 1 stitch(ch or dc), *3 dc in the next 3 dc or ch, 1 ch, skip 1 stitch(ch of dc) *, repeat * until the end of the round and close with a sl | |
| 14 | 192 | hdc | 2 ch, 2 hdc int the next dc, hdc in the hole, *3 hdc in the next 3 dc, hdc in the hole*, repeat * until the end of the round, close with a sc |
| 15 | / | hdc | Crochet 10 hdc in the back loop of every hdc of the previous round, skip 1 hdc and repeat just before the end of the round, don’t close the round anymore with a sl | |
| 16 | / | hdc | *10 hdc, skip 1 hdc *, repeat * until just after the previous round, don’t close the round anymore | |
| 17 | / | hdc | *9 hdc, skip 1 hdc *, repeat * until just after the end of the round, don’t close the round | |
| 18 | / | hdc | *8 hdc, skip 1 hdc *, repeat *until just after the end of the round, don’t close the round |
| 19 | / | hdc | *7 hdc, skip 1 hdc *, repeat * until just after the end of the round, don’t’ close the round | |
| 20 | / | sc | *7 sc, skip 1 stitch *, repeat * until just after the end of the round | |
| 21 | / | sc | Idem 20 | |
| 22 | / | sc | Idem 20 |
| 23 | / | sc | Idem 20 | |
| 24 | / | sc | Idem 20 | |
| 25 | / | sc | Crochet this round with sc | |
| 26 | / | sc | Idem 25 | |
| 27 | / | sc | Idem 25 and close the beret! |
So, I’m already going out with my new beret, spring may continue to itch from now on, I’m not going to be cold anymore!
So follow this pattern and you could easily crochet a beret in 2 days
xox Greet
I love the looks of this beret. However, I am not likely to try to make it with these directions. I do not know what a ‘brume’ or ‘crocet’ is
or what size to expect from these directions
Hallo, thanks for the remarks you made on my pattern. There were some translation problems in the English version. Hope it is better understandable now! The size here is small, with a diameter of 48 cm, I’m going to make a larger one in the near future, but it is only in de the border you have to decrease less.