
Halloween
Crochet for Halloween, we can’t ignore it, it’s a great time to crochet little spooky, witchy, pumpkin-like gadgets. I started looking for some inspiration! What I love most are witches, especially their hats, but I also like pumpkins, and the pumpkin soup too!
Ben je meer vertrouwd met de Nederlandse taal, klik dan hier.
Since I recently crocheted beanies, I choose witch hats!


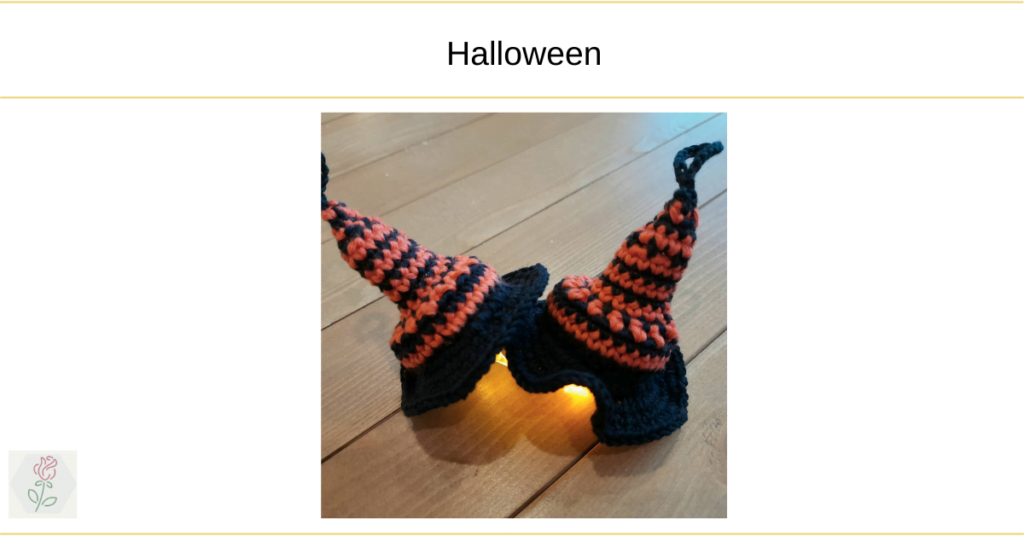
Do you also remember I made little snowmen for Christmas last year? These little snowmen gave me the idea to crochet witch hats with a tea light! Winter is coming and the days are getting shorter, so a little light in the evening makes the room more atmospheric. But if you don’t have an LED tea light, you can easily make it without!
I hope you have fun with this pattern!
Pattern
The hat exist of two parts, the top of the hat and the brume. You have to start with the top of the hat.
Materials
- light weight cotton like drops safran black and orange.
- hook 3
- a little tea LED light, several online stores have this in stock!
Gauge
22 stitches in a row and 25 rows makes a square of 10 by 10 cm

Pattern
Like I mentioned earlier the hat consists of 2 parts. First part is the top and after the top the brume is crocheted at the bottom of the top of the hat.
Top of the hat
| tour | color | stitches | number of decreases | total number of stitches | Remarks |
| 0 | Black | Chain with 20 stitches | 20 | Start with a chain fo 20 stitches and close with a slip stitch. Check if the ring closes tight around the light. As much as you think the light will stay inside when the hat is hanged up. | |
| 1 | Black | Single crochets | 0 | 30 | Make 30 single crochets in the ring |
| 2 | orange | Single crochets | 0 | 30 | |
| 3 | Black | Single crochets | 0 | 30 | |
| 4 | Orange | Single crochets and chains | 15 | 15 | So start with 1 chains, skip a single crochet of the previous tour and crochet first a losse followed by a single crochet. Do this 15 times. |
| 5 | Black | Single crochets | 0 | 15 | Crochet 15 single crochets in each single crochet of the previous tour. |
| 6. | Orange | Single crochets | 0 | 15 | Same as tour 5 |
| 7. | Black | Single crochets | 0 | 15 | Same as 5 |
| 8 | Orange | Single crochets | 0 | 15 | Same as 5 |
| 9 | Black | Single crochets | 0 | 15 | Same as 6 |
| 10 | Orange | Single crochets | 0 | 15 | Same as 5 |
| 11 | Black | Single crochets | 0 | 15 | Same as 6 |
| 12 | Orange | Single crochets | 2 | 13 | Skip a single crochet and work a single crochet, repeat to end of round, fasten with a slip stitch. |
| 13 | Black | Single crochets | 3 | 10 | Single crochets on every single crochet, fasten with a slip stitch. |
| 14 | Orange | Single crochets | 5 | 5 | Skip a single crochet and work a single crochet, repeat to end of round, fasten with a slip stitch. |
| 15 | Black | Single crochets | 0 | 5 | Single crochets on every single crochet, fasten with a slip stitch. |
| 16 | Orange | Single crochets | 2 | 3 | Skip a single crochet and work a single crochet, repeat to end of round, fasten with a slip stitch. |
| 17 | Black | Single crochets | 3 | 1 | Single crochets on every single crochet, fasten with a slip stitch. |
| 18 | Black | Single crochets | Close the litle hole with a slip stitch and make 15 chains. Close this chain with a slip stitch and cut the wire |
The brume
To crochet the collar, take the bottom of the top of the hat and start crocheting at the bottom of the base ring. As you can see in the chart in round 1, try to make 2 single crochets between each single crochet from the first round of the top of the hat! It is a bit tricky but the result is very nice to see, you get a thick borderline.
| tour | color | stitches | number of decreases | total number of stitches | Remarks |
| 1 | Black | 60 | Make two single crochets between every single crochet of the base ring of the hat. Close with a slip stitch. | ||
| 2 | Black | Single crochets | 0 | 60 | Make a tour of single crochets in every single crochet. Close with a slip stitch. |
| 3 | Black | Single crochets | 0 | 60 | Make a tour of single crochets in every single crochet. Close with a slip stitch. |
| 4 | Black | Single crochets | 30 | 90 | Start with two single crochets in the first single crochet, crochet a single crochet in one single crochet two times, again two single crochets in one single crochet and two times a single crochet in the next 2 single crochets. Repeat this until the end of the brum. Close with a slip stitch. |
Now all that’s left to do is tuck in the ends and put in the LED tea light!
If you encounter some problems in this pattern, don’t hesitate to contact me!
xox and many witchy greetings,
Greet
PS. I’ve also got another halloween pattern, my own pumpkin patterns. Here you get a glimpse of them!
(*) This blog post contains affiliate links and if you click through them to make a purchase, I will earn a commission. I link these companies and their products because of their quality and service not because of the commission I receive from your purchase. Please read my disclaimer for more info.